

How to Easily Organise Your Next Website Project: A Beginner’s Guide to Creating a Work Breakdown Structure (WBS)
Learn how to create a Work Breakdown Structure (WBS) for a website project. Follow this simple, step-by-step guide, with examples and FREE downloads.

Working on a website project can feel like juggling a dozen tasks at once.
You’ve got content, design, coding, testing, and—oh yes—client feedback to manage. If you’re working in a marketing or advertising agency and new to project management, keeping all these moving parts organised can be a challenge.
That’s where a Work Breakdown Structure (WBS) comes in. It’s a simple but powerful technique that breaks down any project into smaller, manageable pieces and helps you to visualise all the required deliverables and tasks.
In this guide:
What’s a WBS, and why do you need one?
How to break down a website project into a WBS
An example website project broken down into a WBS
Visualisations with useful templates you can reuse
By the end, you’ll know exactly how to create one for your next website project.
Let’s dive in.
What’s a WBS, and Why Do You Need One?
A Work Breakdown Structure (WBS) splits your project into parts that make it easier to manage. Think of it as a tree. At the top is the final product (a website, for example), and each branch below represents a smaller chunk of work that contributes to the final result.
Why should you care about creating a WBS?
It simplifies a project by breaking large tasks into smaller, clearer deliverables
It prevents mistakes by making sure nothing gets missed.
It keeps your team aligned if you make it a collaborative exercise
It keeps you in control, when the project scope is tight and signed off
Creating a WBS might sound complex, but it’s actually a simple and practical way to get your project organised and planned out during the initiation phase.
Step 1: Break Down the Website Project
Let’s say your client needs a new website with a content management system (CMS). This means you’ll need to create the content, design the site, build it, and test everything before launch.
First, start with the high-level deliverables. These are the big chunks of work, like:
Content creation
Design
Front-end development
Back-end development (CMS setup)
QA/Testing
Deployment
Each of these tasks will break down into smaller, more detailed tasks, which is where the WBS really starts to help.
Step 2: Drill Down Into Specific Tasks
Once you’ve got the main phases of the project, it’s time to get specific.
Each main task should break down into smaller tasks, and there is usually client feedback and sign off at each stage or deliverable.
Here’s what that could look like:
Content Creation
Content Strategy: Plan out what pages the site will need.
Copywriting: Write SEO-friendly text for each page.
Image Selection: Find or create images for the site. Your creatives might want to use an external photographer here, or maybe even AI to assist.
Design
Process flows: Documenting the key steps of a feature or functionality.
Wireframes: Sketch out the main structure of the sites pages.
Concept: The look and feel, based on brand guidelines.
Templates: Designing the core UI templates.
Review: Get feedback and make changes before moving to development.
Front-End Development
HTML/CSS Setup: Build the layout of the website.
Responsive Design: Make sure it looks great on mobile and desktop.
Interactive Features: Add micro-animations, forms and how the pages might build as the user scrolls.
Back-End Development (CMS)
CMS Installation: Set up the content management system on the server.
Custom Development: Add any custom features or plugins.
Security Features: Protect the site with proper security features.
QA/Testing
Functional Testing: Make sure everything works as it should.
Cross-Browser Testing: Check that the site works on Chrome, Safari, and Microsoft Edge.
Mobile Testing: Ensure the site looks and performs well on phones and tablets.
Analytics: Set up and test the analytics software, like Google Analytics 4 or Adobe Analytics. Add all your social media tracking tags.
Deployment
Hosting Setup: Set up the server and domain for the site.
Launch: Make the site live and ensure everything runs smoothly.
Each of these steps is clear and easy to understand. No jargon, just a real process that moves the project forward.
Step 3: Assign Tasks and Deadlines
Now that you’ve got everything broken down, it’s time to assign tasks to team members and set realistic deadlines, by collaborating with the team on how long things will take, and also working with your Traffic Manager (if you have one), to resource bookings.
This makes sure every task has an owner and a timeline.
For example:
Copywriting could be handled by your content team, with drafts due in three weeks.
Wireframes could be assigned to your UX designer, due in one week.
HTML/CSS Setup goes to your front-end developer, due in two weeks.
QA: Might be handled by a Senior QA who will write the test cases. Taking around one week.
Hosting could go to your Head of Development or IT team (tip: speak to them at the start of the project, as this stuff can take a while).
Breaking things down like this ensures that each team member knows what’s expected and when it’s due. It also helps you spot bottlenecks before they become problems.
Step 4: Track Progress and Stay Flexible
One of the best things about using a WBS is that it makes tracking progress simple. You can easily see what’s done and what’s still in progress.
Throw everything into a Kanban Board in your favourite project management tool (like JIRA or Microsoft Planner) to make it super visible.
Remember, things change—especially in marketing and advertising. Clients might request updates, or there might be unexpected delays.
With a WBS in place, it’s easier to see how changes will impact the timeline, and you can adjust tasks and deadlines accordingly.
For example, if the client asks for a new feature halfway through the project, you can look at your WBS and see where it fits. You can also see how it might affect other tasks, so nothing else gets delayed.
Example of a WBS for a Website Project
To bring this to life, here’s what a WBS might look like for an example website project with a content management system (CMS). Assuming that it’s being created from scratch and using a traditional Waterfall approach.
I’ve put in a lot of detail, but in reality, this will give you a great starting point for any web project.
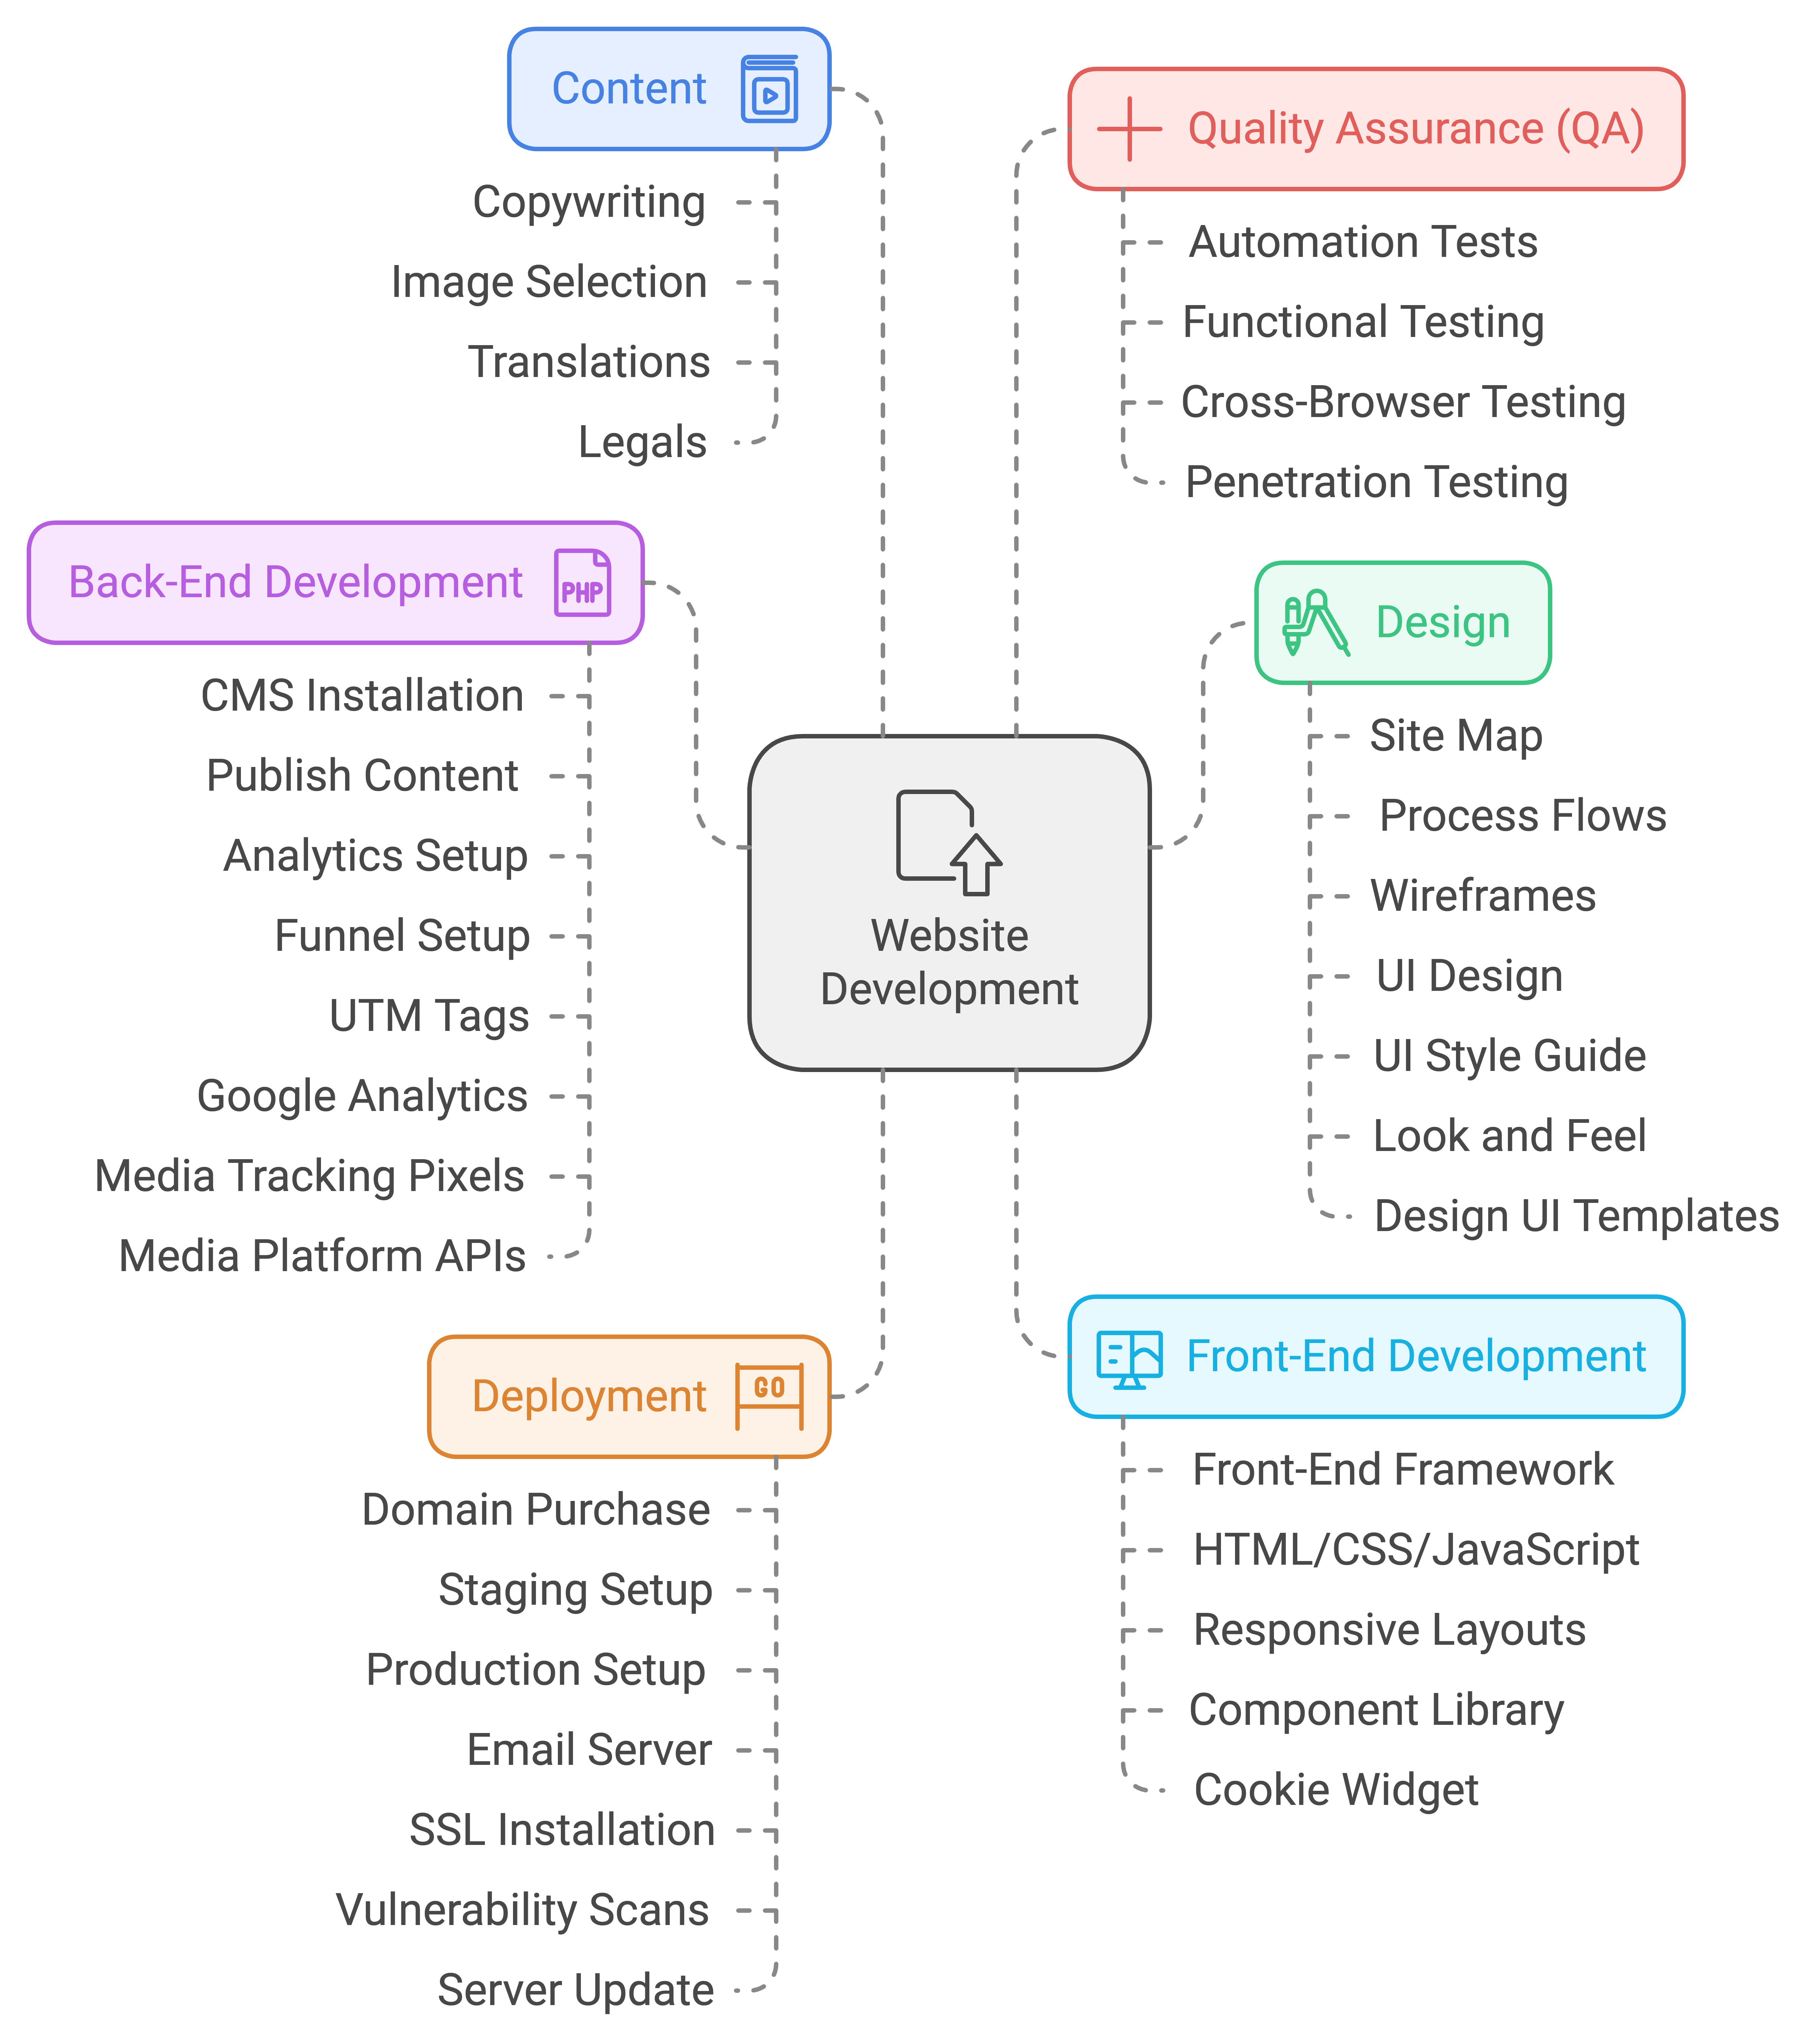
Level 0: Website Development
Level 1: Content
Level 2: Copywriting
Level 3: Source brand guidelines
Level 3: Copy briefing
Level 3: Keyword research
Level 3: Co-create site map w/ UX designer
Level 3: Co-create process flows w/ UX designer
Level 3: Draft copy document
Level 2: Image selection
Level 3: Source brand guidelines
Level 3: Agree image budget
Level 3: Source and select images
Level 2: Translations
Level 3: Agree scope of countries & languages
Level 3: Estimate & timings from partner
Level 3: Send master copy document
Level 3: Receive and file translations
Level 3: Receive certificate of authenticity
Level 2: Legals - Privacy and Cookie Policy
Level 3: Brief data privacy team
Level 3: Receive legal documentation draft
Level 1: Design
Level 2: Information Architecture
Level 3: Co-Create Site map w/ copywriter
Level 3: Co-Create Process flows w/ copywriter
Level 3: Co-create Wireframes w/ UI designer
Level 2: UI design
Level 3: UI style guide
Level 3: Look and feel (1-2 pages)
Level 3: UI templates
Level 1: Front-End Development
Level 2: User Interface (UI)
Level 3: Environment set-up
Level 3: Build HTML/CSS/Javascript
Level 3: Component library
Level 3: Micro animations
Level 3: Cookie widget set up
Level 2: Analytics
Level 3: Funnel set up
Level 3: Add Google analytics code
Level 3: Add Media pixels
Level 3: Add Media platform APIs
Level 1: Back-End Development
Level 2: CMS Installation
Level 3: Install plugins & integrations
Level 3: Set up page templates
Level 3: Set up localisation
Level 3: Set up user permissions
Level 2: Publish content
Level 3: Set up publishing workflows
Level 3: Publish primary language content
Level 3: Publish localised content
Level 1: Quality Assurance (QA)
Level 2: User Acceptance Testing (UAT)
Level 3: Account Handling Team UAT
Level 3: Client UAT
Level 3: Live sanity testing
Level 2: Internal QA Team Testing
Level 3: Write test plan
Level 3: Set up and Run automated tests
Level 3: Functional testing
Level 3: Cross-browser / device testing
Level 3: Testing Exit Report
Level 1: Deployment
Level 2: Server set-up
Level 3: Domain name purchasing
Level 3: Staging environment set up
Level 3: Production environment set up
Level 3: Email server set up
Level 3: Upload to production server (launch)
Level 2: Security
Level 3: SSL certificate installation
Level 3: Vulnerability scans set-up
Level 3: Penetration Test
Each level breaks the project into smaller pieces, making it easier to manage. You can assign each task to team members, set deadlines, and adjust as needed.
Visualise your WBS
I love visualisations.
They are an impressive way of showing off your PM skills and providing information in ways that the more visually-minded members of your team might actually use - like Art Directors and Designers. Hopefully they will pin it to their wall 🙂
Below are several options that you can choose from, depending on your tools and workflow preferences.
Napkin.io - FREE
A fast way of visualising any text is by using napkin.ai. This is a new tool that is hot off the press!
Once you create your account, you can paste your WBS into the editor and pick from a huge amount of visual styles.
You can see my WBS with visualisation on napkin.ai here
And this is my end result for your quick reference.
Draw.io - FREE
Another great tool. I’ve used Draw.io a few times to make visualisations for pitch decks that have technical elements to them.
They have a WBS template you can access by: Create a new diagram > Charts.
I’ve created one you can copy, and also gone a little deeper into the levels too.
Here is the original Draw.io file. You can use it as a template.

Take Control of Any Project
Creating a WBS is a great way of making sure you have your project fully scoped and everything gets done.
I’ve used them effectively on 100’s of projects, including websites, mobile apps, software development, display adverts, social media content, video production and email campaigns.
Collaborate with your colleagues and you’ll get the best results. Visualise and make them accessible so everyone can use it as a guide.
You’ll have a clear plan, your team will know exactly what their work looks like, and your project will get off to a great start.